These days ive been tacking a lot more projects than usual. Its probably cause most of my projects are simple and don't take much time and effort, but they are still darn good to look at and appreciate.For those you who want to display your photos and other nick-knacks in a stylish manner, i think this project would be perfect for you. It really is a easy project that doesn't require much material and you can probably find most of the supplies in your household. For this tutorial I'm not gonna go into that much depth with the instructions, but Im sure you guys will get the idea, and possibly even expand and get extra creative with this project.
Get a good sized frame that can accommodate the photos you want to display. I used a 12x8 plastic frame, you can either use a wooden frame or plastic. Grab yourself a glue gun, scissors, string, and clothes pins.
Since its February, I wanted to be festive and incorporate hearts in this project. You can find these cute heart clothes pins at Michaels craft store for only a dollar, or you can just use plain tiny clothes pins
Turn the frame backwards and measure out the amount of string you'll need to glue to your frame.
Try to make sure you give tension to the string when gluing it onto the frame, and use hot glue on the bottom and top of the string to keep it in place.
Once the glue has dried you can start hanging the pictures on the string with the clothes pins and space them out to your liking. I used a few of my instagram prints which I purchased a while ago and cutouts. It really is as easy as it sounds. Happy Monday all you lovely people!
Valentines is just around the corner, so now is the perfect time to craft up some love. Jumping into this project, I really didn't know how I wanted the end results to look like. I started off with the desired to use heart shapes and triangles and went on from there, piecing everything together. Try it out for yourself!
The supplies your gonna need is:
a glossed wood heart (you can purchase it at Micheals or ACMoore. the one i purchased was painted red )
scissors
a few of your paint swatches
modgepodge
paintbrush
yarn
spray paint (its optional)
fabric glue or hot glue gun
Grab all the supplies you need and grab color swatches that you think would look well together, take into consideration what color you want the heart to be, and think of a color motif that works for you.
I wanted to stray away from the typical Valentines day colors and use gold for the heart and a cool color scheme for the triangles. Spray paint both the front and back of your wooden heart.
This is where the fun part comes in, cut out the paint swatches into different size triangles and start arranging them together. To be honest with you, this takes a while to piece these geometric shapes together, its quite the puzzle. Use modge podge to paste the triangles to the heart. Once your composed a desiring piece with your triangles, apply modge podge on top of your design to give it that glossy look.
Once the modge podge has set and dried, grab your fabric glue or hot gun glue and yarn. Use the yarn to spell out the word "love in cursive". To make it easier you can first write it out on the wood and use that as a guideline. Trace the writing with the glue and immediately place the yarn on top of the glue. I personally rather use fabric glue because its strong and tacky. It doesn't dry as fast as hot glue, so you can take your time. The disadvantage using fabric glue is that it takes forever to completely dry (about 8 hours), but when its dry, its really secure. So after finishing the last letter, measure out how long you want the heart to hang. Take the end of the yarn and glue it to the back of the wooden heart. Make sure the glue is completely dry before you hang it up.
Display your piece of art or even give it as a Valentines gift. You can make this piece as personal as you want. Experiment with
different shapes, textures, and you can even use cut out photographs
to add to the heart. Really make it your own!
Well to end this post I want to leave you with a video of The Civil Wars singing
"Tip of My Tongue". I had this video on replay and I typed up this tutorial, such a lovely song. Happy Saturday guys
After finishing a hot cup of morning joe from Starbucks, you eventually toss out the cup along with the coffee sleeve. Well the next time you buy yourself a cup of coffee, you may want to rethink about tossing out that cardboard sleeve.
A few days ago I took a trip to Starbucks to grab an americano, after downing this cup of goodness, I ripped apart the sleeve out of boredom. Immediately I thought the ridges inside of the sleeve would be a perfect stamp, especially since I'm a sucker for lines and patterns. Tried it out and I loved the results the ridges on the sleeve make. So the next time you grab some coffee, save the sleeve and try it out yourself! Its super duper easy and this stamp would be perfect for other paper projects. I put together a simple tutorial for you guys..
Take a coffee sleeve and rip the ends apart and decide on what shape you'd want to cut out.
Once you cut out the shape you desire, glue something on back of the piece to be used as a knob. I used a hot glue gun to glue one of my tiny thread spools on back of the piece, and it worked perfectly.
Place some ink or paint on a plate and gently place your stamp on the ink. You might want to test the stamp on a piece of paper before you stamp it onto the actual paper you want for the pattern.
There ya have it, easy as can be. The results look pretty awesome, especially if you stamp the pattern on top of each other. Hope you have fun with this tutorial!
Just as I listed as one of my goals this year, I want to spend more time painting and drawing, and really be consistent with it. Often times, ideas come to me but I honestly don't do much with these visions, instead I set them aside with the rest of my collection. To release these ideas on an empty canvas and paper is what I hope to do. I thought I should discover and try out new techniques, use different mediums, and allow life's wonders inspire me. So I took a trip to my local craft store and purchased a pack of 4" by 4" tiny flat canvas. With these little blank surfaces, I plan to paint on a canvas every week. Each piece will portray the significance of my week or anything that really inspires me. After a few months I hope to have collected a bunch of tiny paintings/drawing/collages displayed on my wall. I'll try my best to post up my creations every week. For those of you who have a crafty and creative mind, I encourage you to put those skills into practice. Whether it be through art, photography, or music, embrace them. Dont you dare let them run dry, let those creative juices flow. Happy Friday y'all!
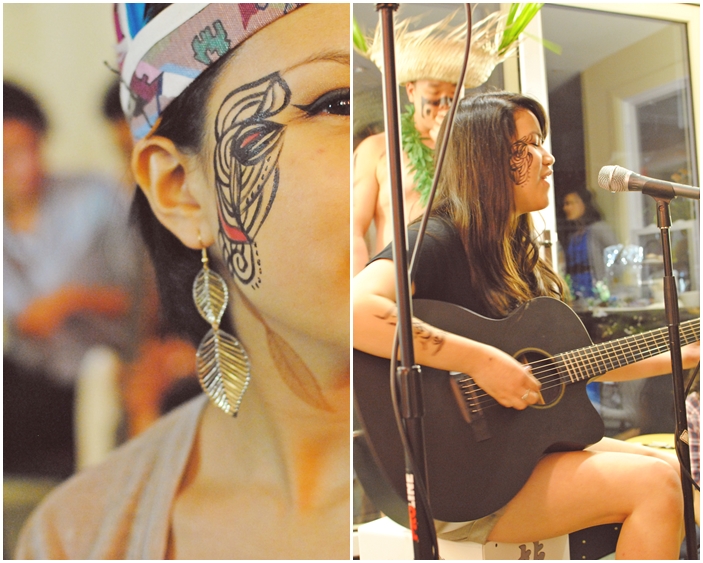
Last month I had quite the crafty spree, working with a flood of colorful feathers and plenty of suede. I constructed individual tribal head pieces which were used for a friend's themed birthday party. I know Halloween is over and done with this year but these feathered headbands are such fun pieces, that I would wear em every now and then, well the less extravagant ones of course. Unfortunately for this post I cant put together a tutorial, but i'll post some pictures of the finished pieces, and hopefully it will set a heap of creative ideas and inspiration.
I'LL leave you guys with a bunch of pictures from Laya's birthday party (L.Event). This party was just not any ordinary birthday party. It was beautifully filled with amazing performances(singing&spoken word), face/body paint, tribal wear, and just wonderful people. I'm sure it was a unforgettable event for everyone.
So October is the month when pumpkins are in season and I just about love everything pumpkin. Ive only carved pumpkins a few times through out my life and I have to admit, I terribly lack skill in carving pumpkins. They never turn out the way I picture it to be, so instead I chose to go the easy route and paint pummy pumpkins.
Oct 1st marked the 8th year of the Crafty Bastards Arts and Crafts festival. Again it was held at Marie Reeds Learning Center in Adams Morgan. This fun artsy festival is filled with amazing crafty vendors, a huge variety of yummy food, and tons of entertainment. Last year was the first year I attended this festival and I absolutely loved it! I have long awaited for this day to come so the rain and cold weather couldnt really stop me and neither did stop the rest of DMV area, there were tons of people who came out this year. Anyways, I took quite a few shots of the event and the art pieces i utterly adored and here they are below, along with a link to the artist's site...
Such a neat idea, turning old books into journals!
Gosh i want one of these felt creatures hanging on my wall Horrible Adorables<---- love the name This adorable boy is quite the sales man, i just had to buy a stamp after his stamp demonstration. I was really impressed, he actually designs most of the stamps Gioconda Padovan
The artist, Kristen Rask came all the way from Seattle to share these little stuffed creatures which are undeniably cute Schmancy Toys